


What are Administrative Units in Purview?
Today we will dive into the importance that Administrative Units (Entra ID feature) have when configuring Microsoft Purview, specially when we look at large enterprises, who have multiple companies or entities spread over the world.
This scenario can also be used for organizations who want to separate the insights on their sensitive data per department, f.e. Legal, Finance, HR, etc.
Some more info about Administrative Units and Purview: Administrative units in the Microsoft Purview compliance portal | Microsoft Learn
Administrative units let you subdivide your organization into smaller units and assign specific administrators that can manage only the members of those units.
Microsoft Purview role groups allow you to assign admins to specific administrative units.
Microsoft Purview solutions that support administrative unit will then restrict visibility and management permissions to the members of the unit.
For example, you could use administrative units to delegate permissions to administrators for each geographic region in a large multi-national organization, or for grouping administrator access by department within your organization.
You can create region or department-specific policies or view user activity as a result of those policies and administrative unit assignment.
You can also use administrative units as an initial scope for a policy, where the selection of users eligible for the policy depends on membership in administrative units.
Let's move to a fictional company example
In my demo environment, I’ve created a fictional shipping company called Straw Hats Inc. (YES, I’m a big One Piece fan).
This organization is setup to have 2 sub-organizations called The Merry Corp. and The Sunny Corp.
This way I could configure 3 Administrative Units and assign the correct end-users in those Administrative Units dynamically! If done correctly, this is a one time setup, I’ll guide you through the process later in this post.
Let’s first take a look at the organization:

So I made it visible with colors to make it easy, the head organization, Straw Hats Inc. exists of the C-Level, and some underlying employees in our example. This organization is colored in blue.
We can see Luffy as CEO, Zoro as CISO, Robin as CDO, etc etc.
But we have 2 entities or sub-companies here clearly visible also:
The green colored organization is The Sunny Corp and it consists of key members who will play an important role in the organization.
We have Brook as Security and Privacy Officer. Doflamingo as an HR officer, and ofc One Piece fans know he’s not such a good guy, so he will do some data exfiltration in later blogposts.
The grey colored organization is the Merry Corp, and also here we have some key members. We also see Jinbe here as the Security and Privacy Officer, Hancock as an administrative assistant and Rayleigh as an IT admin.
When we set up these Administrative Units correctly, you will later see that Brook and Jinbe will only have insights on their data in their sub-company when it comes to MPIP, DLP, IRM etc etc.
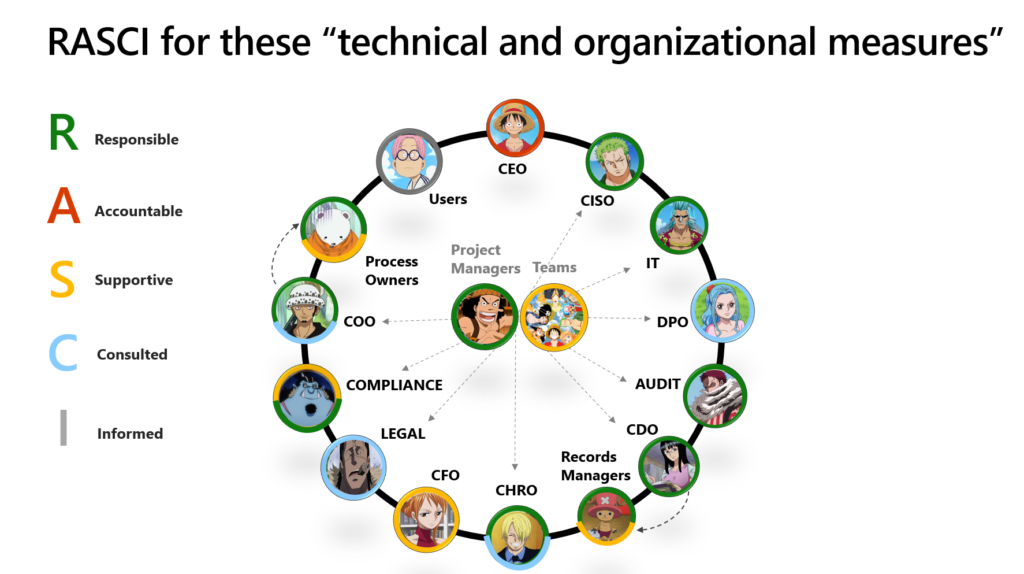
I’ve also created a RASCI when it comes to the responsibilities each of our employees will have in the organization. This will come back in later blog posts when we will dive deeper in the technology, but mostly when it comes to who will be doing what.
How to configure these Administrative Units in Entra ID?
You will see that we will have to configure these in two different places, first of all we will create them in Entra ID, then we will go to the Purview portal.
Let’s first start in Entra ID. As you can see below I created all the users in my Entra ID tenant. Very important is that all the properties are filled in correctly at the user level, so we can create dynamic groups later based on the Company property for example.
Another option (also when you are still syncing your users from on-premises is to use custom attributes).
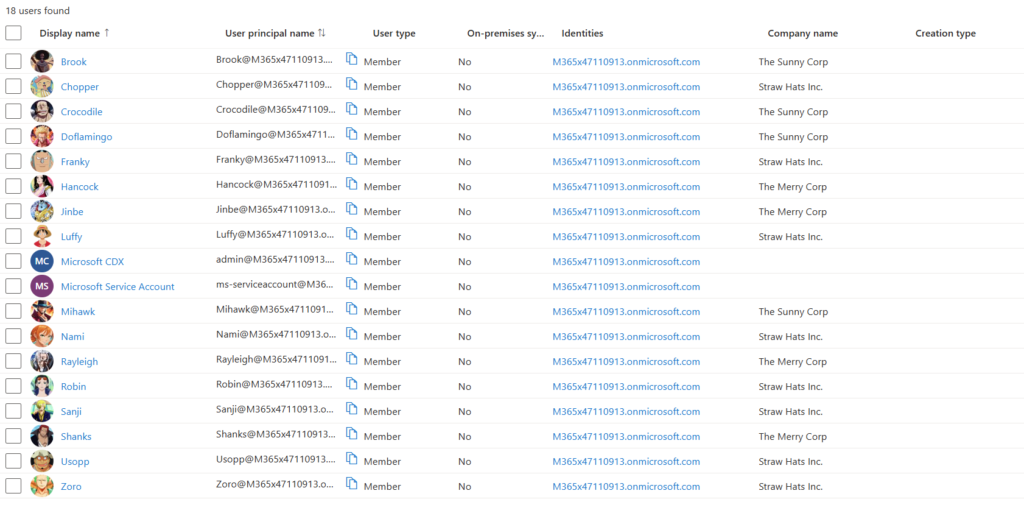
But in my case I filled in the Company Name property correctly for each employee in my fictional company. This gives us the advantage to easily create the Administrative Units:

In my image you can see that I created 3 of them, one for each company or sub-company.
You can also see that these have Dynamic as Membership type, this means that these Administrative Units are populated dynamically. More specifically in my case I created a query on two triggers:
– Enabled User = true
– Company Name = Straw Hats Inc. / The Sunny Corp / The Merry Corp

What does this exactly mean? That new users, who enter a the company or one of the sub-companies will always automatically end up in one of these Administrative Units.
Also when someone leaves the company and their user gets disabled or deleted, it will disappear from the Administrative Units.
As we want, we just need to maintain our user management, the rest goes autodynamically 🙂
PS: to obtain this, you need to set the Membership type in properties to Dynamic User!
How to configure these Administrative Users for the roles in Purview?
Now let’s go to the new Purview portal: purview.microsoft.com
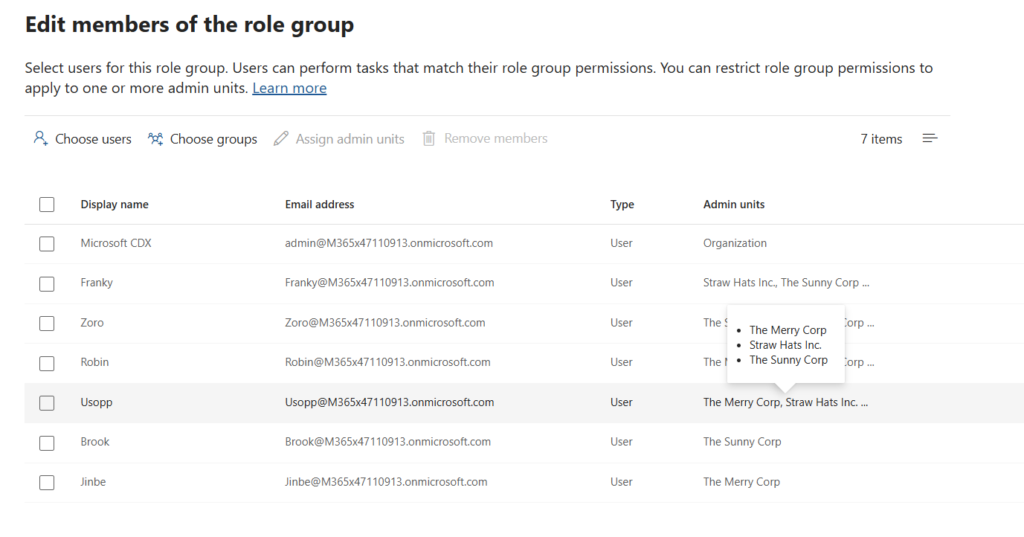
Then navigate to Role Groups (Settings – Roles and Scopes).
In our example, we are gonna give our Security and Privacy Officers, Jinbe and Brook only insights on their data in their sub-organization when they log in into the Purview portal.
We are gonna assign them the Compliance Administrator role (remember this is a demo environment example – IRL you would always work with the least privilege role or create custom roles so your users can only just do what they need to do. And IRL in best case scenario we don’t assign roles directly, but we let our end-users elevate themselves through Privileged Identity Management – this will be the next blog post on how we can achieve this with Purview roles & PIM; Back to our scenario now:
Our Project Manager Usopp of course needs insights in all sub-companies as he will be leading the project of implementing the necessary features to be NIS2/ISO27K/DORA or whatever regulation necessary you want to comply to.
So we click on edit for the Compliance Administrator role, and when we add these three users, after adding them we can select ‘Assign Admin Units’ to assign the appropriate Administrative Units to the endusers.
Conclusion
Sometimes take a step back before directly diving into the Purview portal to configure MPIP, DLP or other features.
Think about what the company wants to achieve, how they wanna keep data in a department (think Legal – HR – Finance), and start with always the most important thing, IDENTITY.
Afterwards, make sure you assign the correct role in the Purview portal, and make sure to configure Administrative Units also there.
But there is much more to do with Administrative Units now, and we will continue this in another blog post.
Because now that we have the basics set up, we can configure:
– Sensitivity Labels with Admin Units
– DLP policies with Admin Units
– IRM policies with Admin Units
And much much more.
Happy testing and feedback is always welcome!
Cloud Boy

